rtk.Application
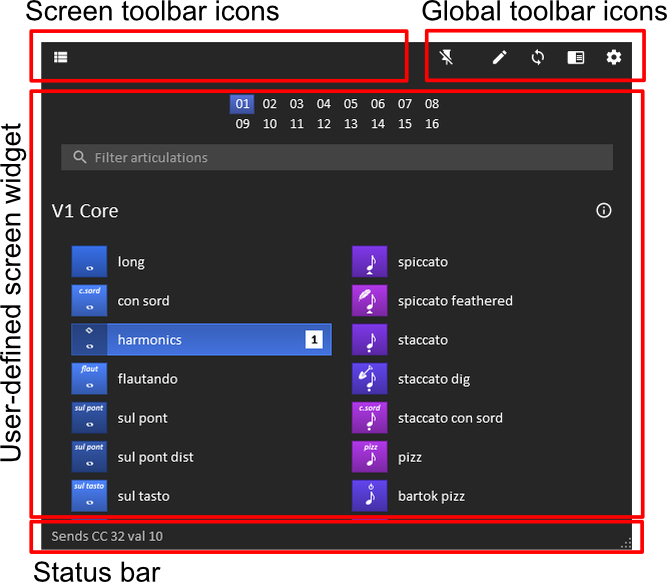
A basic application layout with toolbar, center content area, and status bar, with support for navigation between screens.
Here is an example application (Reaticulate),
showing the regions provided by rtk.Application:
local window = rtk.Window()
local app = window:add(rtk.Application())
app:add_screen{
    name='main',
    init=function(app, screen)
        screen.widget = rtk.Text{'Main app content would go here'}
        screen.widget.onmouseenter = function()
            app:attr('status', 'This is a pointless status message')
            -- Indicate this is handled so onmouseleave() gets fired
            return true
        end
        screen.widget.onmouseleave = function()
            app:attr('status', nil)
        end
    end,
}
app:add_screen{
    name='settings',
    init=function(app, screen)
        screen.widget = rtk.Text{'Settings page content goes here'}
        -- If you have multiple buttons, you could use a rtk.HBox
        -- as the toolbar instead.
        screen.toolbar = rtk.Button{'←   Back', flat=true}
        screen.toolbar.onclick = function()
            -- Navigate back to previous screen.
            app:pop_screen()
        end
    end,
}
-- Create the application-wide toolbar buttons that will be added to the
-- right side of the toolbar.
--
-- This assumes the icon path was previously registered with
-- rtk.add_image_search_path() and that settings.png exists there, or
-- an rtk.ImagePack was registered that contains the name "settings"
local settings = app.toolbar:add(rtk.Button{icon='settings', flat=true})
settings.onclick = function()
    -- The button just opens the settings page
    app:push_screen('settings')
end
window:open()
| status | string | read/write |
The text of the status bar, or nil to clear |
| statusbar | rtk.HBox | read-only |
The box that represents the status bar of the Application widget |
| toolbar | rtk.HBox | read-only |
The box that represents the toolbar of the Application widget |
| screens | table | read-only |
The table of screens as registered with |
| rtk.Application() | Create a new application with the given attributes |
| add_screen() | Adds a screen to the application, which can later be shown |
| push_screen() | Makes the given screen visible, and pushes it to the screen stack |
| pop_screen() | Pops the current screen off the screen stack, making the previous screen visible |
| replace_screen() | Replaces one screen in the screen stack with another |
| current_screen() | Returns the table for the current screen |
The text of the status bar, or nil to clear.
The box that represents the status bar of the Application widget.
If you don't want a statusbar, then simply hide it:
local app = rtk.Application()
app.statusbar:hide()
The box that represents the toolbar of the Application widget.
You can add your own widgets to this box container (usually rtk.Button),
and they will be aligned to the top-right of the Application.
Individual screens can add their own widgets to the left-portion
of the toolbar -- see add_screen() for details.
The table of screens as registered with add_screen(), keyed on the
screen name. A special stack field exists within this table that
indicates the order of the current open screens as managed by
push_screen(), pop_screen(), and replace_screen().
local app = rtk.Application()
app:add_screen(some_screen_table, 'settings')
app.screens.settings.update()
Create a new application with the given attributes.
Adds a screen to the application, which can later be shown.
The given screen is a Lua table comprised of the following fields:
rtk.Application instance, and the screen table. Any non-nil
value returned by this function will be stored in the widget field. (Alternatively,
you are free to set screen.widget directly.)push_screen() or replace_screen() and which receives
the same arguments as screen.init().rtk.Widget subclass that is to be the middle content area of
the screen. The widget is added to the Application box expanded,
with both fillw and fillh set to true. This
widget is typically a container widget such as rtk.VBox or rtk.Viewport.rtk.Widget subclass that is to be added to the left side of
the application toolbar when the screen is visible, acting as the screen-local
toolbar. This is usually an rtk.HBox populated with one or more rtk.Button
widgets.name parameter
of this method must be passed, and this field will be set to that value)local app = rtk.Application()
app:add_screen{
name='settings',
init=function(app, screen)
-- Create a screen-specific toolbar and add a back button to it,
-- which just pops the last screen from the screen stack.
screen.toolbar = rtk.HBox()
local back = screen.toolbar:add(rtk.Button{'← Back', flat=true})
back.onclick = function()
app:pop_screen()
end
-- Some dummy content
local box = rtk.VBox()
for i = 1, 100 do
box:add(rtk.Text{string.format('Line %d', i)})
end
return rtk.Viewport{box}
end
}
If this is the first screen added, then it will automatically be made visible.
Subsequent screens will not be visible unless push_screen() or replace_screen()
are called.
| screen | (table) | the screen to register with the application as described above |
| name | (string or nil) | the name of the screen (which may be nil |
Makes the given screen visible, and pushes it to the screen stack.
After this is called, you can navigate back to the previous screen
by calling pop_screen().
| screen | (table or string) | the screen table or name of the screen |
Pops the current screen off the screen stack, making the previous screen visible.
| (bool) | true if the current screen was popped, or false if the current screen is the first screen in the stack and so can't be popped. |
Replaces one screen in the screen stack with another.
| screen | (table or string) | the screen table or name of the screen that is to replace the existing one |
| idx | (number or nil) | the index of the screen to replace, where 1 is the screen at the bottom of the stack. If nil, then the current screen is replaced. |
Returns the table for the current screen.
This is simply a convenience function for accessing the last element of screens.stack, which includes bounds handling.
| (table or nil) | the table of the current screen, or nil if |


